Prepare Deep-Learning-Ready VMs on Google Cloud Platform
Plus Some Practical Tips
Aug 10, 2018 · 1010 words · 5 minute read

[The 2nd YouTube-8M Video Understanding Challenge](http://The 2nd YouTube-8M Video Understanding Challenge) has just finished. Google generously handed out $300 Google Cloud Platform(GCP) credits to the first 200 eligible people, and I was lucky enough to be one of them. I wouldn’t be able to participate in this challenge at a higher level otherwise. My local hardware can barely handle the size of the dataset and is not strong enough to handle the size of the model. The least I can do to return the favor is to write a short tutorial on how to set up deep-learning-ready VMs on GCP and about some tips that I’ve learned.
Cloud Compute and Its Pricing
By using ML Engine you can get rid of the problem of setting up the VM. It also comes with other tools like HyperTune. However, if your budget is tight, creating VMs on Cloud Compute will save you a lot of money. Especially after Cloud Compute started to offer “preemptiblity” option for GPUs earlier this year, and recently further dropped their prices. It’s so cheap that for me the costs incurred from storing the full 1.6 TB datasets were almost the same as from the K80 GPU core. (I used n1-standard-2/n1-standard-4+ 1 K80 core for training and n1-standard-4 for evaluating and predicting.)
The Prepackaged VM images
GCP actually provides images that work with GPUs now. I did not know that when I started working on this competition, so I started from scratch(to be precise, from one of my CPU VM snapshot). You can skip the next step which installs NVIDIA driver if you use these images.
Step-by-Step Instructions
Step 1: Install NVIDIA Driver
Find the corresponding driver on the NVIDIA website. For me, it’s Tesla Driver for Ubuntu 16.04 (Go to “SUPPORTED PRODUCTS” tab to double-check). Download and install it:
wget "http://us.download.nvidia.com/tesla/384.145/nvidia-diag-driver-local-repo-ubuntu1604-384.145_1.0-1_amd64.deb"

sudo dpkg -i nvidia-diag-driver-local-repo-ubuntu1604-384.145_1.0-1_amd64.deb

sudo apt-key add /var/nvidia-diag-driver-local-repo-384.145/7fa2af80.pub

sudo apt-get update

sudo apt-get install cuda-drivers
Run nvidia-smi command to check if the installation was successful.
Step 2: Install nvidia-docker

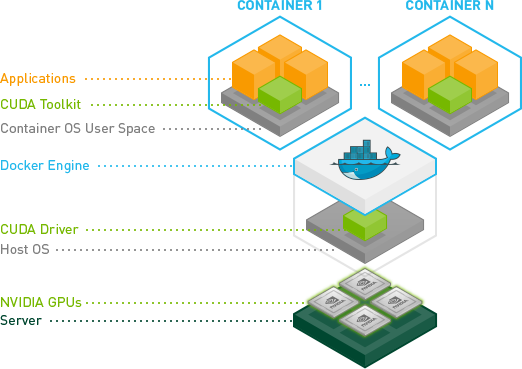
I chose to use nvidia-docker and used docker images to mange my environments. As introduced in one of my previous post (link below), nvidia-docker only depends on the NVIDIA driver, so we get to use different versions of the CUDA toolkit in different images/containers. This can be extremely helpful when the pre-built binaries of deep learning frameworks supports different versions of CUDA toolkits.
Related post: Docker + NVIDIA GPU = nvidia-docker — Portable Deep Learning Environments.
Just follow the installation instructions from the nvidia-docker:
# If you have nvidia-docker 1.0 installed: we need to remove it and all existing GPU containers

docker volume ls -q -f driver=nvidia-docker | xargs -r -I{} -n1 docker ps -q -a -f volume={} | xargs -r docker rm -f

sudo apt-get purge -y nvidia-docker

# Add the package repositories

curl -s -L https://nvidia.github.io/nvidia-docker/gpgkey | \

sudo apt-key add -

distribution=$(. /etc/os-release;echo $ID$VERSION_ID) #ubuntu16.04

curl -s -L https://nvidia.github.io/nvidia-docker/$distribution/nvidia-docker.list | \

sudo tee /etc/apt/sources.list.d/nvidia-docker.list

sudo apt-get update

# Install nvidia-docker2 and reload the Docker daemon configuration

sudo apt-get install -y nvidia-docker2

sudo pkill -SIGHUP dockerd
Run docker run --runtime=nvidia --rm nvidia/cuda nvidia-smi to check if the installation was successful.
You’ll probably want to take a snapshot of the boot disk at this point.
Step 3: Pull or Build the Docker Image
For Tensorflow there are plenty of official images on Dokcer Hub, I used this image: tensorflow/tensorflow:1.8.0-gpu. Simply run this command to pull the image to local:
docker pull tensorflow/tensorflow:1.8.0-gpu
For PyTorch you have to build the image yourself locally. Clone the PyTorch Git repo and run this command:
docker build -t pytorch -f docker/pytorch/Dockerfile .
Or you can write your own Dockerfile and includes all the packages you’d like to use in your project. Here are the ones I’ve been using: Tensorflow and PyTorch.
You are good to go! Start a container by docker run --runtime=nvidia -ti <other options> image_name bash and do training/prediction inside that container. The deep learning framework should be able to utilize the GPU core(s) now. It’s really this simple.
(Optional) Step 4: Create a Data Disk
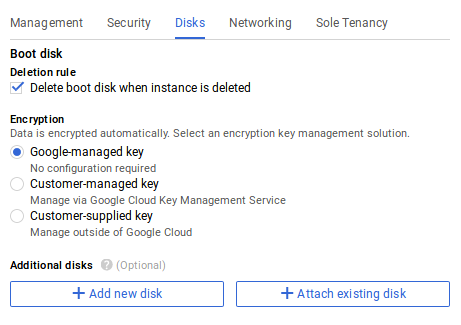
Pro tip #1: It’s generally a good idea to store the dataset on a different disk from the boot/system disk. This leads to independent snapshots of the dataset and system data, and adds a lot of flexibilities.

You’ll have to create the disk, and attach it to the VM either via Web UI or the command line tool. Then you’ll have to format the new disk and mount it:
sudo mkfs.ext4 -m 0 -F -E lazy_itable_init=0,lazy_journal_init=0,discard /dev/sdb

sudo mkdir /data

sudo mount -o discard,defaults /dev/sdb /data
To make the system auto-mount the new disk, edit this file: /etc/fstab.
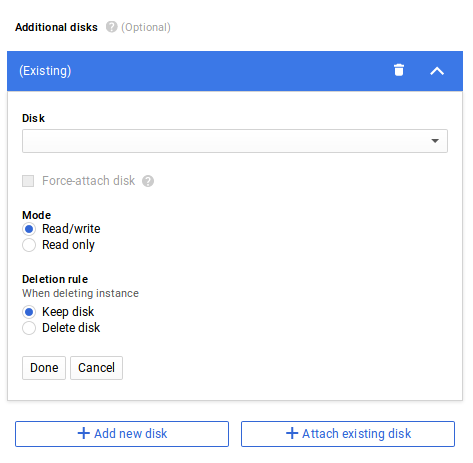
Pro tip #2: You can share a data disk among different VMs as long as it’s attached in read-only mode. This is what you need to do:
-
Create a VM and download the dataset to the data disk.
-
Shutdown the VM, edit the VM options and change the “attach mode” of the data disk to read-only.
-
Create another VM with the data disk attached in read-only mode.

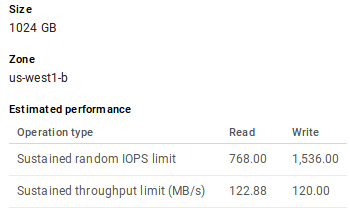
Now you can run two VMs and two models simultaneously using the same data disk. Note that a disk have I/O limits, so don’t attach it to too many VMs:

An Example of Estimated Disk I/O Performance
(Optional) Step 5: Open Network Ports
If you plan to use Jupyter Notebook, Jupyter Lab, visdom, or Tensorboard on the VMs, you’ll need to open the corresponding ports in the firewall settings:

I recommend using a config file (e.g. jupyter_notebook_config.json) to set the password for Jupyter.
Thank You
This tutorial is not really GCP-specific except for the last two optional steps. It should be applicable to other cloud platforms and even to local machines with no or very little modification.
Having said that, I still had to spend quite some time searching and experimenting things I found on the Internet before finally reached a solution that I’m satisfied with. Hopefully this tutorial can save you folks some time. And please feel free to leave any kinds of feedback.