Overview
Preamble
I started doing this competition (iMet Collection 2019 - FGVC6) seriously after hitting a wall doing the Freesound competition. It was really late (only about one week until the competition ends), but by re-using a lot of code from the Freesound competition and using Kaggle Kernels to train models, I managed to get a decent submission with F2 score of 0.622 on the private leaderboard (the top 1 solution got 0.672, but used a hell lot more resources to train).
My Final LB Position
Compared to the Freesound competition, this competition has larger train and test dataset, and the cross-validation results are much more reliable. So I spent a lot more time learning from top solutions and try improving my model post-competition. It is a really slow process since I can only try one or two new things a day. I’m not done yet, but I figure writing down some preliminary findings now can serve as a good checkpoint, to prevent I get distracted by something and forget about them. A Part 2 ideally will be coming soon with more conclusive results.
Challenge Description
In this dataset, you are presented with a large number of artwork images and associated attributes of the art. Multiple modalities can be expected and the camera sources are unknown. The photographs are often centered for objects, and in the case where the museum artifact is an entire room, the images are scenic in nature. Each object is annotated by a single annotator without a verification step. Annotators were advised to add multiple labels from an ontology provided by The Met, and additionally are allowed to add free-form text when they see fit. They were able to view the museum’s online collection pages and advised to avoid annotating labels already present. The attributes can relate to what one “sees” in the work or what one infers as the object’s “utility.” While we have made efforts to make the attribute labels as high quality as possible, you should consider these annotations noisy. There may be a small number of attributes with similar meanings. The competition metric, F2 score, was intentionally chosen to provide some robustness against noisy labels, favoring recall over precision.
(Emphasis mine.)
This is essentially a (noisy) multi-label image classification problem. There are two type of labels (called attributes in this dataset): culture and tag[1]. Culture labels are more generic, e.g. “american”, “british”, “french”. Tag labels have a wider range of specificity, e.g. “landscapes”, “boy”, “dogs”, “working”. Tags are less noisy than cultures, and some tags are very similar to ImageNet classes[2].
Solution Strategies
There were some cheating allegations[8] near the end of the competition. The competition host has not responded to these allegations yet, but there are some convincing evidences that someone did cheat. Therefore, I’m not going to include the solutions of those whose integrity is in doubt (thus the solution is just “story-telling”, as someone put it).
Every top solutions use transfer learning (fine-tuning pretrained model). So the development process can be simplified into three parts:
- Pick a pretrained model (se-resnext50, inceptionV3, etc.) and finetuning strategy (gradual unfreezing, discriminative learning rates, etc.).
- Design input image preprocessing and augmentation pipeline
- Post-processing the predicted labels.
I mainly focus on the first two part post-competition. Post-processing is more problem-specific and troublesome to implement. The post-processing idea shared in the top solutions includes:
- Use different prediction thresholds for tag and culture labels. [2][5]
- Use pseudo labeling to improve the label quality of training set. [2][5]
- Use specialized models that targets one of tag or culture label group. [2]
- Context-aware thresholding (adjust threshold for each image according to the max probability of that image). [4]
Finetuning strategies shared includes:
- Using knowlodge distillation (teacher/student) technique to compress a large ensemble of models into a smaller one. [5]
- Use the input from the last two (Resnet) layers instead of the last one. [6]
- Unfreeze only the last two (Resnet) layers. [6]
- Hard-negative mining (samples 5% of samples with the biggest loss on the previous epoch to current). [2]
- Focal loss[2][3][7] and FBeta loss[5].
I was confused about what does the last two “layers” mean in the 10th place solution [6]. After some experiments, I think it means the layer that encapsulate multiple residual blocks with the same feature map size. All Resnet variants have five such layers. The last two layers contains most of the parameters, so the training won’t be sped up by much. But the first three layers consumes most memory (the widths and heights of their feature maps are larger), so we can use larger batch sizes when training.
I manage to improve the validation scores of se-resnext101 models using the unfreezing-last-two technique, but the improvements are not significant, probably due to the resource constraint (I can’t train enough batches). More experiments are needed on this topic.
Focal loss was not really helpful in my experiments. But again, this might have something to do with my hyper-parameters and requires more investigation.
Image preprocessing and augmentation will be discussed in a later section.
Preprocessing and Augmentation
This is the data pipeline I used in my competition submission (it uses albumentations package[19]):
(For those who are not familiar with albumentations, In addition to the official documentation[8], there is also a live demo page [11] for you to explore.)
This pipeline is rather aggressive, and uses stochastic TTA(test-time augmentation). The image size 256x256 is chosen mainly with the speed of training in mind (discussed in more details in the next section).
I split the data into ten folds, and randomly select one of se-resnext50, se-resnext10, and densenet161 models for each fold. The final submission is a simple rank average of the predictions from the 10 models.
After the competition ends, I tried the pipeline used in the first place solution:
Beside using a much larger image size (320x320), it only crop when necessary (those with very marginal aspect ratios), and use resize to transform the image into a square one. The TTA becomes deterministic, with one run with horizontal flipping off, and one with flipping on.
The following are some examples that are more demonstrative of the differences between the data pipelines:
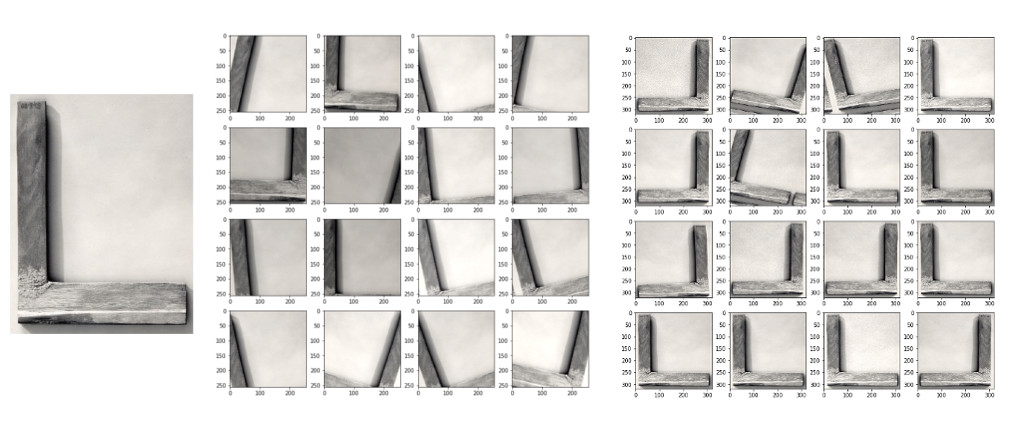
left: origin; middle: mine; right:Gavrilchik’s
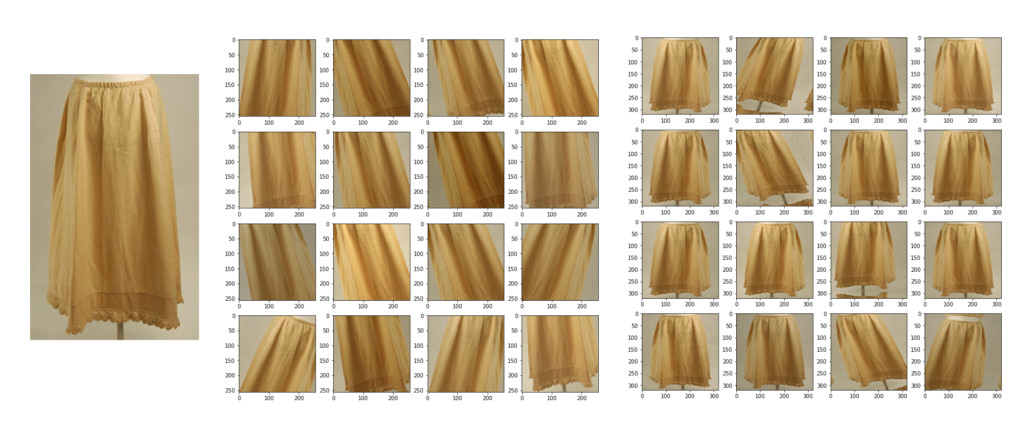
left: origin; middle: mine; right:Gavrilchik’s
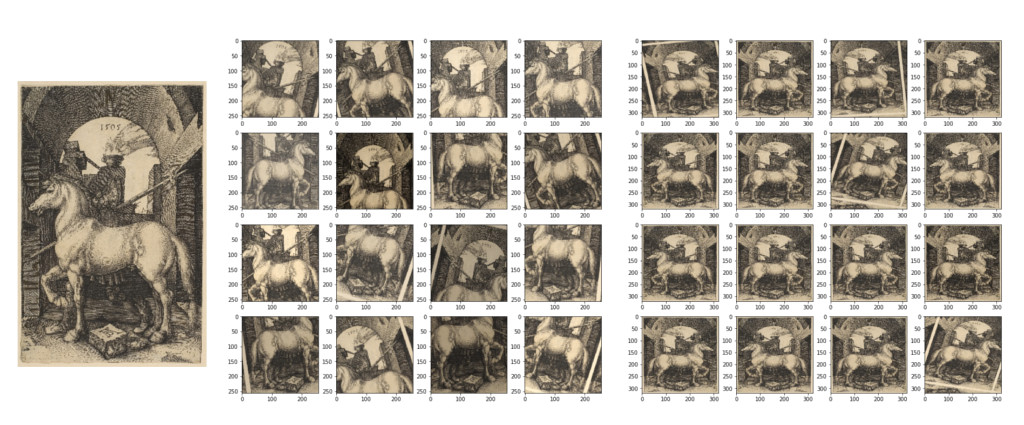
left: origin; middle: mine; right:Gavrilchik’s
Admittedly, the results generated by my pipeline sometimes are very hard to discern even with human eyes. The resizing technique, while creating some distortion(squeeze) in the result images, keeps most of the important components intact.
By switching to this new pipeline, I managed to achieve the same private leaderboard score with only three se-resnext50 models. And their CV scores are roughly on par with the one reported by the 10th place team[6].
Future work
- Try resizing to smaller sizes (e.g. 256x256).
- Try padding to square instead of resizing to square (similar method used in [4]).
- Ablation study of Mixup augmentation. (The 1st place solution did not mention using Mixup, but I used Mixup in every setups.)
- Try cutout/random-erasing.
- Try SGDM optimizer[7] instead of AdamW.
Train Models using Kaggle Kernels
Kaggle Kernels[12] upgraded their GPU offerings from K80 to P100. It’s already more powerful than my GTX 1070, with more computing capability and a lot more memory. It’s by far the best option for those with low budget but high demand of GPU memory.
You can run up to 4 kernels simultaneously and each one can run up to 9 hours in one session at the time of writing. I trained all my models on Kaggle, which would have cost a fortune if I train them on, say, Google Cloud Platform.
Comparing to Google Colab
Google Colab GPU session comes with a Tesla T4 GPU (sometimes K80) at the time of writing. It is less powerful than P100, but its Tensor Cores can compensate the difference when using mixed-precision training. One session can live at most 12 hours. And it also has a arguably slightly better user interface than Kaggle Kernels.
There are two main reasons that I did not use Google Colab to train models in the competition:
- Google Colab requires continuous connection to the session when training, while Kaggle Kernels does not (hit ‘Run’ and then you can close the browser window). Google Colab will kill the session if you are not connect to it in more than 30 minutes or so (not sure the exact number, feel free to correct me).
- You can have only one GPU session on Google Colab at a time, while on Kaggle you can have four (meaning you can train 4 models simultaneously).
Google Colab is still quite useful for developing and testing, though. The notebook mode of Kaggle Kernels is basically unusable for me, as it keeps disconnecting and refreshing (and going back to the top of the page) on its own. It’s also why I only use the script mode in the following subsection.
My Workflow
The source code used for this competition is shared on github at ceshine/imet-collection-2019.
The first step is the zip the source code, upload to Kaggle as a Dataset, along with other external dependencies: Public Codebase. The reasons to include external dependencies are:
- The inference kernel does not allow Internet connection (so no
pip install) - even if the package is preinstalled in Kaggle kernel, Kaggle might upgrade the package at any time and potentially breaks your code. My inference kernels were broken when Kaggle upgrade the version PyTorch to 1.1. It’s relatively harder to (re-)install PyTorch yourself in Kaggle Kernel, but you can avoid the same problem for all other smaller packages.
Now you can train models as in this Kernel: iMet Trainer. Note that I use delegator to simplify interaction with the system shell, but you can use the built-in subprocess to achieve the same thing. Download the trained model to your local folder.
Upload the trained model to Kaggle as a new Dataset: Public iMet 2019 Models.
(Optional) Run the validation kernel to check the CV score with TTA: iMet Validation Kernel (Public).
Run the inference kernel and submit to get leaderboard score: iMet Inference Kernel (Public).
That’s it! You don’t even need to own a GPU yourself. Any regular laptop that has Internet connection should suffice for the task (though you might take some measures to make your eye, back, and shoulder more comfortable).
Things that can be improved
- Experiment log keeping: It’s harder to keep track of experiment results since you are syncing codebase, different kernels use different versions of codebase, and each kernel takes half a day to run. I use a notebook to manually write down version numbers and their corresponding CV and LB scores, which is time-consuming. A more automated workflow will be much better.
- Continue training: one Kernel session can run at most 9 hours. Most larger pretrained models takes longer than that to finetune to a proper state. Find a way to easily split the training into multiple sessions is required for those models. A proper solution would include resumable learning rate scheduler, a way to specify training stage, etc. (This can be really time-consuming as you need to hand over model weights from one kernel to another.)
- Notifying you when the kernel has finished training or encounter errors: I’ve incorporated a Telegram bot to the codebase in the next competition. This is really useful when you have other works to do and have to leave the kernel running itself.
References
- [EDA] Compare number of culture and tag attributes
- 1st place solution
- 4th place solution
- 6th place solution
- 9th place solution
- 10th place Solution
- [Solution] Public: 0.657 => Private: Error
- Revealing such great score and call for the justice
- leaderboard-analysis
- albumentations: albumentations is a fast image augmentation library and easy to use wrapper around other libraries
- Albumentations Demo
- How to use Kaggle: Kernels Documentation
- ceshine/imet-collection-2019
- Mixed Precision Training on Tesla T4 and P100