
Introduction
If you are familiar with software engineering, you’d know that automatic testing and continuous integration can save you a lot of debugging time when a project is complex enough and/or involves collaboration between contributors. They help you make sure the new code doesn’t break anything that it’s not supposed to and quickly narrow down the scope of places that could go wrong when failures inevitably happen.
For data scientists, we have to test not only against code but also against data to make sure our data pipelines are working correctly. Just like new code can break your software, new data can also break your pipelines. Great Expectations is a tool that protects you from problematic new data:
Great Expectations helps teams save time and promote analytic integrity by offering a unique approach to automated testing: pipeline tests. Pipeline tests are applied to data (instead of code) and at batch time (instead of compile or deploy time). Pipeline tests are like unit tests for datasets: they help you guard against upstream data changes and monitor data quality.
Great Expectations has some high-quality tutorials in their documentation to get users started. However, they can be a bit intimidating. I know I was intimidated, but I somehow gathered enough bravery to go through the essential parts anyway. I wrote this post so you don’t have to (at least at first).
This post provides a simplified version that creates tests against a SQLite database I used to store scrapped box office data. I also provide references to the official tutorials where I can, so you can refer to them when things are not clear to you.
Steps to Create Tests(Expectations)
Prerequisite: pip install great_expectations SQLAlchemy
- Initialize Great Expectations and set up the data source [doc1] & [doc2]
- Use the
scaffoldcommand to bootstrap an expectation suite for a table. [doc] - Edit the expectation suite to better fit your use case. [doc]
- Create a checkpoint for the expectation suite [doc]
- Repeat 2-4 for every table you want to test against in the database.
Checkpoints are used to run the expectation suites (a.k.a. validate the data). The most simple way to run them is via the command line, Great Expectations will return a non-zero number to the shell when an expectation suite fails.
SQLite Example
Assuming we already scraped the data and write the data into a SQLite database located at /absolute/path/to/db.sqlite:
Initialization and Data Source
Run the init command in the root project folder and press ‘y’ to the prompt:
great_expectations init
Then answer ‘y’ to “Would you like to configure a Datasource?” and pick 2. Relational database (SQL) in the next step.
Select 6. other - Do you have a working SQLAlchemy connection string?, and give a name to the database.
Finally, input sqlite:////absolute/path/to/db.sqlite (You’d want to use the absolute path here. Otherwise the generated notebooks will have problems finding the database) and answer ‘y’ to complete the setup.
(Answer ’n’ to Would you like to profile new Expectations for a single data asset within your new Datasource?. The automatic profiling doesn’t work on my SQLite database.)
Bootstrap an Expectation Suite
In this example, we want to create an expectation/test suite for the table movies first. Run the suite scaffold command:
great_expectations suite scaffold movies
A Jupyter notebook will pop up in your browser. Change the second cell to:
included_columns = [
    # 'id',
    # 'name',
    'release_date',
    'country',
    # 'publisher',
    # 'agent'
]
So the expectations for the release_date and country columns will be generated automatically.
Run the entire notebook once. A Data Docs page will pop up in your browser. There should be some unsuccessful expectations. That is “expected”(pun intended). We’ll fix them in the next step. You can close all browser tabs and the Jupyter instance now.
Edit the Expectation Suite
You can find the edit command on the Data Docs page for the expectation suite:
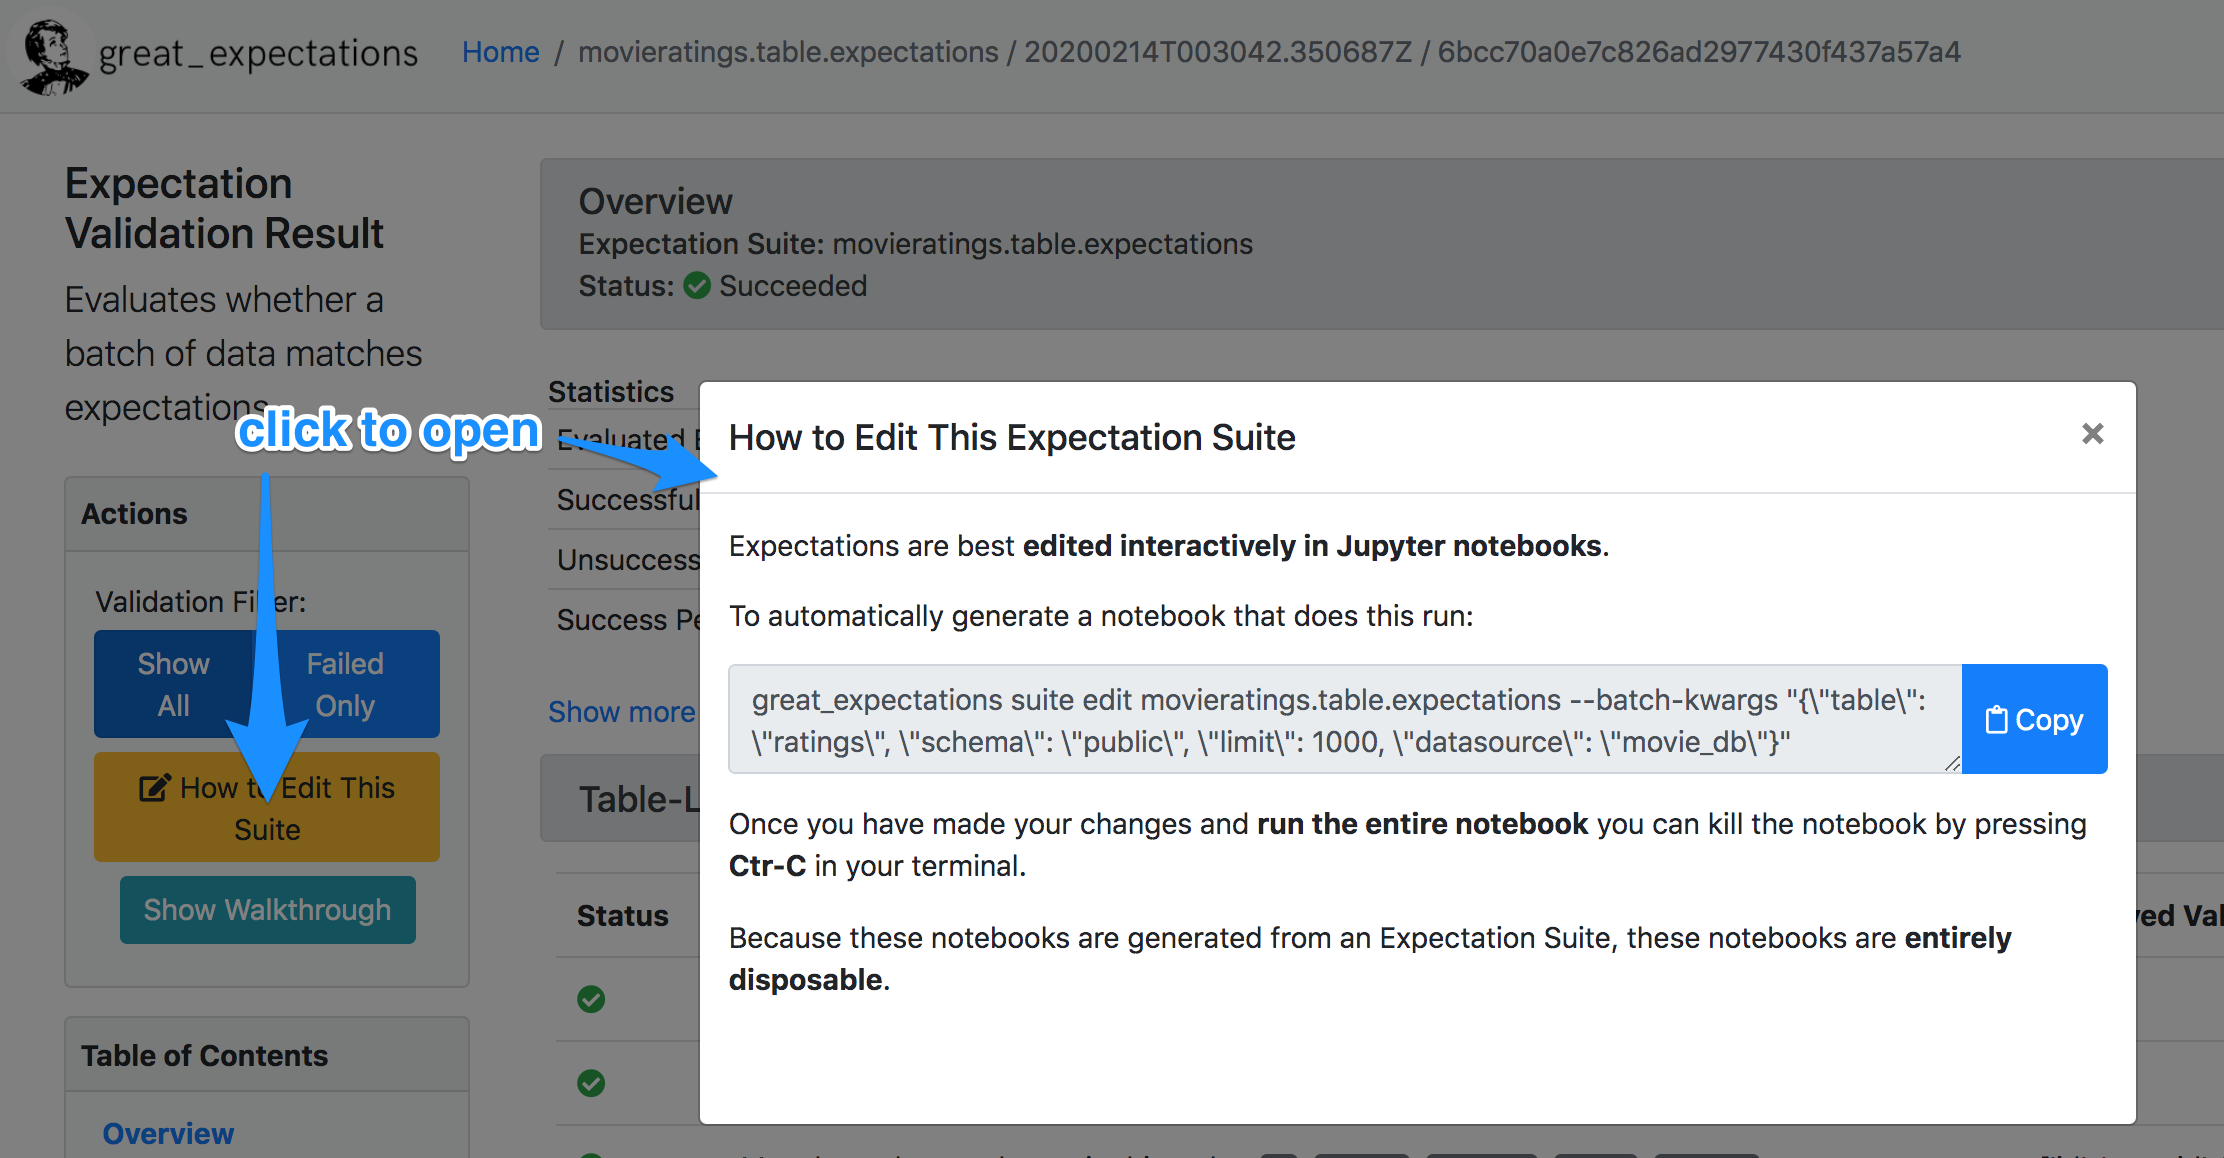
Where to find the edit command. source
In our case, it’s great_expectations suite edit movies. Run it, and again a Jupyter notebook will popup in your browser.
In the new notebook, you can edit, remove, or add new expectations for each column. One of the great things about using a Jupyter notebook is that you can run the expectations in the notebook and get the results interactively. This makes developing expectations much easier.
To avoid problems, restart the notebook kernel and re-run the whole notebook when you’re done. The expectation suite will be updated according to the content of the notebook.
Here are some of the expectations I use for the movies table:
At least 95% of the release date should be later than 2015-01-01
batch.expect_column_values_to_be_between(
    column="release_date",
    min_value="2015-01-01",
    mostly=0.95,
    parse_strings_as_datetimes=True,
)
The character counts of the country names should be between 2 to 10
batch.expect_column_value_lengths_to_be_between(
    column="country", max_value=10, min_value=2
)
Create a Checkpoint
Simply run this command to create a checkpoint:
great_expectations checkpoint new movies.chk movies
Validate the data using the checkpoint
great_expectations checkpoint run movies.chk
View the Data Docs
Each validation run will generate an entry in the data docs. Data Docs is actually a generated static website living in your project directory. You can access them by opening the index page in the browser(I use Firefox in the example):
firefox great_expectations/uncommitted/data_docs/local_site/index.html
Additional Notes on Validation
Merging Checkpoints
You can manually merge the checkpoints generated by the CLI. The following combines two checkpoints for the table movies and the table weekly_box_office:
validation_operator_name: action_list_operator
batches:
  - batch_kwargs:
      table: movies
      schema: main
      data_asset_name: main.movies
      datasource: my_database
    expectation_suite_names: # one or more suites may validate against a single batch
      - movies
  - batch_kwargs:
      table: weekly_box_office
      schema: main
      data_asset_name: main.weekly_box_office
      datasource: my_database
    expectation_suite_names: # one or more suites may validate against a single batch
      - box_office
Deploying Checkpoints
You can deploy checkpoints with cron, Airflow, Google Cloud Composer, and more.
You can also run checkpoints inside Python, and set up notifications via Slack.
Fin
We’ve demonstrated a basic Great Expectations case study targeting a SQLite database in this post. Great Expectations can also work with databases much larger than this one. It supports the common relational databases, BigQuery, Redshift, Spark, Snowflake, and more. I hope this post makes getting started with Great Expectations easier for you. Please let me know if you have any questions or suggestions.