
Introduction
In Part 1 of this series, we’ve discussed why building your own annotation tool can be a good idea, and demonstrated a back-end API server based on FastAPI. Now in this Part 2, we’re going to build a front-end interface that interacts with the end-user (the annotator). The front-end needs to do mainly three things:
- Fetch a batch of sentence/paragraph pairs to be annotated from the back-end server.
- Present the pairs to the annotator and provide a way for them to adjust the automatically generated labels.
- Send the annotated results to the back-end server.
Disclaimer: I’m relatively inexperienced in front-end development. The code here may seem extremely amateur to professionals. However, I hope this post can serve as a reference or starting point for those with similar requirements.
Prerequisites
This post assumes you have basic understandings of Javascript, React, HTML, and CSS/Sass. If you don’t, please refer to the learning resources mentioned in Part 1.
You need to install npm on your system (one recommended way is via nvm), and create a new React project using the Create React App.
We’ll be using the Bulma CSS framework. The way we used to integrate Bulma into React is to install the bulma, node-sass, and react-bulma-components package (via npm). We’ll also be using the immutable package to store the states in React.
The following section will be built on the created project.
Code-through
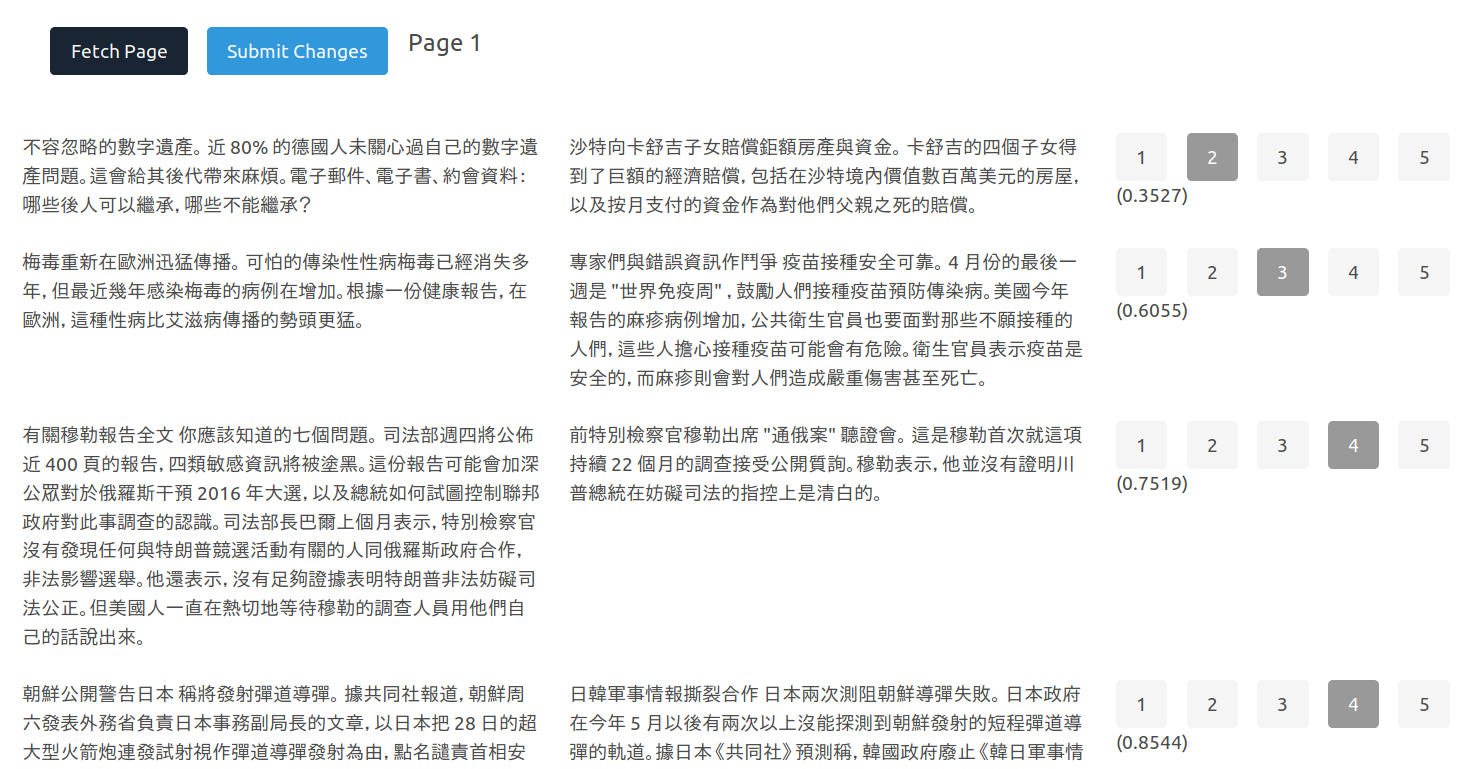
Let’s take another look at what we’ll be getting at the end of this section:
The source code for this post can be found at veritable-tech/text-annotation-react-frontend.
Page Layout
The overall page layout is defined in the render method in src/App.js:
render() {
  return (
    <section className="section">
      <div className="container">
        <section className="section">
        <Button color="primary" onClick={this.fetchBatch}>
            Fetch Page
        </Button>
        {this.state.page !== null ? (
            <Button color="info" onClick={this.submitBatch}>
            Submit Changes
            </Button>
        ) : (
            ""
        )}
        {this.state.page !== null ? (
            <span className="subtitle">Page {this.state.page + 1}</span>
        ) : (
            ""
        )}
        </section>
        <Entries
        page={this.state.page}
        pairs={this.state.pairs}
        changeScore={this.changeScore}
        />
      </div>
    </section>
  );
}
There are two buttons, one for fetching a new batch/page and one for submitting the changes made to the fetched batch. The submit button will only be displayed when a batch/page has been fetched.
We’ll create an Entries React component that is responsible for displaying the pairs and also collecting the annotations. The two states in the App component — page and pairs — are passed to the Entries component as properties. There is also a function changeScore that is passed to handle the changes in labels.
The App Component
This is the main React component that every data and logic will go through. We start by initializing the application state:
class App extends Component {
  constructor() {
    super();
    this.state = {
      page: null,
      pairs: null,
    };
    // These two methods will be added soon in the following sections
    this.fetchBatch = this.fetchBatch.bind(this);
    this.submitBatch = this.submitBatch.bind(this);
  }
}
Fetching a Batch
We use the Fetch API to make requests to the back-end API server:
async function getBatch() {
  const res = await fetch(SERVER_ENDPOINT + "batch/", {
    method: "GET", // *GET, POST, PUT, DELETE, etc.
    mode: "cors", // no-cors, cors, *same-origin
    cache: "no-cache", // *default, no-cache, reload, force-cache, only-if-cached
    redirect: "follow", // manual, *follow, error
    referrer: "no-referrer", // no-referrer, *client
    credentials: "include",
  });
  if (!res.ok) {
    throw Error(res.statusText);
  }
  return res;
}
The credentials: "include" is necessary to make sure fetch sends the cookies to the back-end, since the front-end is not always hosted at the same place as the back-end (therefore will have different origins). The mode: "cors" part is for the same reason.
The error handling in this function is very bare-bone, and will require you to use the developer console in browser to view the error messages. Nonetheless, this interaction is fairly simple and will almost never go wrong if your server and browser is on the same machine or in the same network. You can improve the error handling if you’re dealing with more complicated scenarios.
The following method of the App component call the getBatch function and set the application states afterwards:
async fetchBatch() {
  const res = await getBatch();
  const data = await res.json();
  const pairs = data.pairs.map(x => [
    x[0], // text_1
    x[1], // text_2
    x[2], // raw score
    x[3], // adjusted score
    Math.round(x[3] * 4) / 4 // transformed label
  ]);
  this.setState({
    page: data.page,
    pairs: fromJS(pairs)
  });
}
The Math.round(x[3] * 4) / 4 part automatically transform the continuous predictions (with range [0, 1]) from the model into discrete labels {0, 0.25, 0.5, 0.75, 1.}, which will be displayed as {1, 2, 3, 4, 5} in the Entires component.
The Entries and Entry Component
The Entries component is fairly simple. It just goes through the pairs property and creates one Entry component for each pair:
class Entries extends Component {
  render() {
    if (this.props.pairs === null) {
      return <div></div>;
    }
    return this.props.pairs.map((value, idx) => (
      <Entry
        row={value}
        idx={idx}
        key={idx}
        changeScore={this.props.changeScore}
      />
    ));
  }
}
The Entry component is where the main UI lives:
const Entry = (props) => {
  return (
    <div className="columns">
      <div className="column">{props.row.get(1)}</div>
      <div className="column">{props.row.get(2)}</div>
      <div className="column">
        <Button
          className={props.row.get(4) === 0 ? "is-dark" : "is-light"}
          onClick={props.changeScore(props.idx, 0)}
          disabled={props.row.get(4) === 0}
        >
          1
        </Button>
        {/* Code for other buttons is ignored to save space */}
        <span>({props.row.get(3).toFixed(4)})</span>
      </div>
    </div>
  );
};
The code should be quite straightforward. Let me know in the comment if any of the above is unclear to you.
The props.row.get(3).toFixed(4) part is the adjusted similarity score from the model and is displayed for reference (mostly for debugging).
The only “moving part” in the sub-section is the changeScore function/method that is called when a user clicks on one of the activated label buttons:
changeScore = (i, score) => () => {
  this.setState({
    pairs: this.state.pairs.set(i, this.state.pairs.get(i).set(4, score)),
  });
};
What it does is updating the label of the ith pair. Because we’re using immutable objects, what actually happens is a new pairs List object is created to replace the old one.
Submitting the Results
Now we’re at the final piece of the puzzle. The postBatch function is very similar to the getBatch function, except for the method and body parameters:
async function postBatch(batch) {
  const res = await fetch(SERVER_ENDPOINT + "batch/", {
    method: "POST", // *GET, POST, PUT, DELETE, etc.
    mode: "cors", // no-cors, cors, *same-origin
    cache: "no-cache", // *default, no-cache, reload, force-cache, only-if-cached
    redirect: "follow", // manual, *follow, error
    referrer: "no-referrer", // no-referrer, *client
    credentials: "include",
    body: JSON.stringify(batch),
  });
  if (!res.ok) {
    throw Error(res.statusText);
  }
  return res;
}
And the submitBatch method of the App component prepares the payload for the fetch request, and displays an alert to the user when the submission has been successfully accepted by the back-end server.
async submitBatch() {
  const payload = {
    page: this.state.page,
    pairs: this.state.pairs.map(x => [x.get(0), x.get(4)])
  };
  const res = await postBatch(payload);
  const data = await res.json();
  console.log(data);
  alert(`Submit Success: ${data.success} ${data.message}`);
}
This is just the Beginning
Here we conclude our journey of building a customized annotation tool. As you can see, it’s not as hard as you might think. Almost all the changes I’ve made to the base React project have been fit inside this single blog post! And the 2,000 annotations I’ve made via this tool can testify that it works well enough (the actual number at the point of writing is approaching 3,000).
There is a lot of space for improvement, of course. In a lot of cases, you can just use the modifiers of Bulma to make your UI look better. For more complicated cases, you can write your own CSS like I’ve briefly done in the App.scss file. You can add a page selector as I mentioned in Part 1. You can implement an account-based user management system. It’s all up to your specific use case and imagination.
I hope this series has been helpful to you, and thank you for reading all the way to this point. If you have any specific questions or recommendations, please let me know in the comment section.